As much as I feel fully comfortable going about my day without a trace of makeup on, or with my hair all in a mess, I must confess that I feel naked without any nail polish on. Summer 2010 was when I discovered my love for doing my nails, with the help of OPI Russian Navy (stolen from Debs) and OPI Got the Blues for Red (first one I owned). Soon afterword, OPI released their amazing Fall 2010 Swiss Collection, which completely won me over with its stunning cream and shimmer shades: Just a Little Rösti at This, Diva of Geneva, Lucerne-tainly Look Marvelous, and Ski Teal we Drop were my picks.
Since I started buying hordes of nail polishes with each season's collections, it was inevitable that I eventually perfected my own manicure routine, with some great tool/method discoveries along the way. Wednesday marked the first night of Hanukkah, a Jewish holiday, otherwise known as the Festival of Lights. Hanukkah commemorates the story of the Maccabee army, a small band of Jews that managed to beat the mighty Greeks. A great miracle occurred when the Maccabee's only had enough oil to burn for one night, but it managed to last eight nights! On Hanukkah, we Jews celebrate this miracle by lighting candles for eight straight nights, giving presents, and consuming mass amounts of food with our loved ones. Since I wasn't able to spend the holidays at home with the family (though we did FaceTime our first candle lighting, don't worry), I decided to unleash some festive spirit the best way possible: Hanukkah. Themed. Nails. I also documented my detailed step-by-step manicure routine, including my holy grail nail care products, and tons of tops for beginners that I have learnt over the years:
Since I started buying hordes of nail polishes with each season's collections, it was inevitable that I eventually perfected my own manicure routine, with some great tool/method discoveries along the way. Wednesday marked the first night of Hanukkah, a Jewish holiday, otherwise known as the Festival of Lights. Hanukkah commemorates the story of the Maccabee army, a small band of Jews that managed to beat the mighty Greeks. A great miracle occurred when the Maccabee's only had enough oil to burn for one night, but it managed to last eight nights! On Hanukkah, we Jews celebrate this miracle by lighting candles for eight straight nights, giving presents, and consuming mass amounts of food with our loved ones. Since I wasn't able to spend the holidays at home with the family (though we did FaceTime our first candle lighting, don't worry), I decided to unleash some festive spirit the best way possible: Hanukkah. Themed. Nails. I also documented my detailed step-by-step manicure routine, including my holy grail nail care products, and tons of tops for beginners that I have learnt over the years:
1. Choosing your Shade
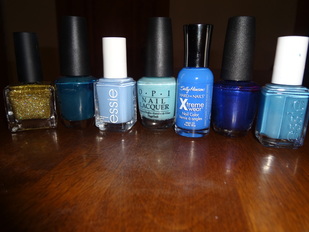
Sadly, I have a complex process for picking my nail polish colour. First, I usually decide on a colour family (purples, reds, darks, pastels) and texture (cream, shimmer, glitter, etc.). Since I was following a Hanukkah theme, I knew I wanted to use a blue cream and a gold glitter, and narrowed it down to the ones you see here. From Left to Right: Urban Outfitter's Gold Glitter, OPI Ski Teal we Drop, Essie Bikini so Teeny, OPI What's with the Cattitude?, Sally Hansen Pacific Clue, OPI Tomorrow Never Dies, and Essie Coat Azure. Sadly, these are not the only blues, nor the only gold glitter, that I have in my collection. I always have difficulty making a final decision on my own, and usually end up asking my mother (or boyfriend) to make the decision for me. Debs (mom) ended up choosing Ski Teal we Drop by OPI (second polish from the left) , to pair with the Urban Outfitter's Gold Glitter for my accent nails (yes, I know accent nails are so 2011, but I'm still not over them).
Sadly, I have a complex process for picking my nail polish colour. First, I usually decide on a colour family (purples, reds, darks, pastels) and texture (cream, shimmer, glitter, etc.). Since I was following a Hanukkah theme, I knew I wanted to use a blue cream and a gold glitter, and narrowed it down to the ones you see here. From Left to Right: Urban Outfitter's Gold Glitter, OPI Ski Teal we Drop, Essie Bikini so Teeny, OPI What's with the Cattitude?, Sally Hansen Pacific Clue, OPI Tomorrow Never Dies, and Essie Coat Azure. Sadly, these are not the only blues, nor the only gold glitter, that I have in my collection. I always have difficulty making a final decision on my own, and usually end up asking my mother (or boyfriend) to make the decision for me. Debs (mom) ended up choosing Ski Teal we Drop by OPI (second polish from the left) , to pair with the Urban Outfitter's Gold Glitter for my accent nails (yes, I know accent nails are so 2011, but I'm still not over them).
2. Prepping for Polish
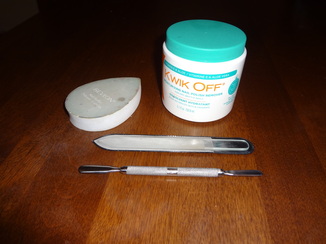
In my opinion, the work you do to prep your nails before applying polish is equally (if not more) important than the actual nail polish application itself. Naturally, you should always start with clean, unpolished nails. For someone like me, I usually go straight from one nail polish colour to the next, and need to start my manicure by actually removing whatever I had on my nails previously. Personally, once I discovered these polish-removing tubs, equipped with sponges for convenience, I have yet to go back to the traditional liquid + cotton pad combination. This tub is the Kwik Off Moisturizing Nail Polish Remover by Sally Hansen, though any similar product will suffice; I usually just buy whatever is cheapest when I run out. After removing all traces of colour, I file each nail individually. Now listen, if you will take anything away from this blog post, let it be this: YOU NEED A GLASS NAIL FILE IN YOUR LIFE. I fully credit the discovery of this holy grail product to my mother (Debs), who has used the same glass nail file for as long as I can remember. Yes, these nail files are (and should) be more expensive than your traditional, run-of-the-mill sticker-on-cardboard nail files. However, these babies are made to last, if you invest in a good-quality one. I honestly do not know where this is from, as my mother bought it for me four years ago AND I AM STILL USING IT WEEKLY (but I would check your local beauty/nail supply shop). If you want to do your manicure quickly and efficiently, then a glass nail file is your new best friend. You're welcome.
In my opinion, the work you do to prep your nails before applying polish is equally (if not more) important than the actual nail polish application itself. Naturally, you should always start with clean, unpolished nails. For someone like me, I usually go straight from one nail polish colour to the next, and need to start my manicure by actually removing whatever I had on my nails previously. Personally, once I discovered these polish-removing tubs, equipped with sponges for convenience, I have yet to go back to the traditional liquid + cotton pad combination. This tub is the Kwik Off Moisturizing Nail Polish Remover by Sally Hansen, though any similar product will suffice; I usually just buy whatever is cheapest when I run out. After removing all traces of colour, I file each nail individually. Now listen, if you will take anything away from this blog post, let it be this: YOU NEED A GLASS NAIL FILE IN YOUR LIFE. I fully credit the discovery of this holy grail product to my mother (Debs), who has used the same glass nail file for as long as I can remember. Yes, these nail files are (and should) be more expensive than your traditional, run-of-the-mill sticker-on-cardboard nail files. However, these babies are made to last, if you invest in a good-quality one. I honestly do not know where this is from, as my mother bought it for me four years ago AND I AM STILL USING IT WEEKLY (but I would check your local beauty/nail supply shop). If you want to do your manicure quickly and efficiently, then a glass nail file is your new best friend. You're welcome.

I have also recently began pushing back my cuticles, once again by Debs' recommendation (insistence), and use a dual-ended metal contraption in order to do so. Although I don't notice a huge difference when I push my cuticles back (#yourcuticleslooksexypushedback), it takes only a mere couple of minutes to do so. The main element I miss from getting real manicures done is when they would cut off all of my dead cuticle skin, since it prevented me from picking at it (close second: the hand massage). Pushing the cuticles back sort of does the same trick. The last step involves using the teardrop-shaped Revlon crazyshine Nail Buffer. There are several similar buffer products (some even come equipped with a file, but it doesn't hold a candle to my glass one) on the market, though I have enjoyed this one for quite some time now. First, you use the buffer side to smooth the surface of your nails, and finish with the crazyshine side, which leaves your nails rather shiny. If you're the type of person who frequently leaves your nails bare, then I would highly recommend picking one of these buffers up at the drugstore. Once all of these steps are complete, my nails tend to look like what you see in the picture above. Yes, there is some minor yellowish discoloration on my nails. BUT, the camera made them look a lot more yellow than they do in real life. For someone who always has nail polish on, my nails are in pretty good health, thank you very much.
3. Applying the Polish (Base, Colour, Top)
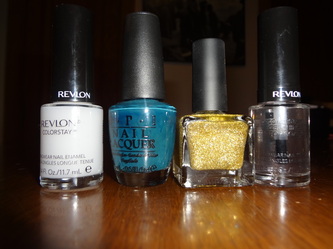
Finally, I'm getting to the actual nail polish application. I follow the traditional of: 1 coat of Base Coat, 2 coats of colour, 1 coat of glitter accent (if applicable) and 1 coat of top Top Coat (which may increase to 2 coats over the glitter). For the past year, I have been loving the Revlon Colorstay Base Coat (005) and Revlon Colorstay Gel-Shine Top Coat (010), and have gone through a couple of bottles of each (for more information about this base/top coat combination, see here).
When I first started doing my nails, I used to fully apply all of the layers to my left hand, waited until it dried completely, and then move on to my right hand, which is always more of a struggle due to my right-hand dominance. Although I have moved on from doing this, and now do each layer on both hands before continuing, my biggest tip to avoid streaking/clumping is to be patient. Some other potentially-usefull guidelines:
- Try to rest your arms on a surface comfortably, like a table, as opposed to leaning over the floor.
- Keep it to a minimum: one large stroke down the centre and one on each side should be enough
- Keep some cotton swabs + liquid remover on hand for touch-ups
- If you mess up/smudge (and you have time to spare): take a deep breath, remove all of the polish from that nail, and start from scratch. This looks a million times better than just layering on top of the mistake
- If you have any sort of fan (I use my room fan), this can help speed up the drying process
- If you have the time, try to wait until your last layer is mostly dry before applying your next coat
- Go to the bathroom before you do your nails! There's nothing worse than having to pee and getting your nails ruined in the process
4. The Extras
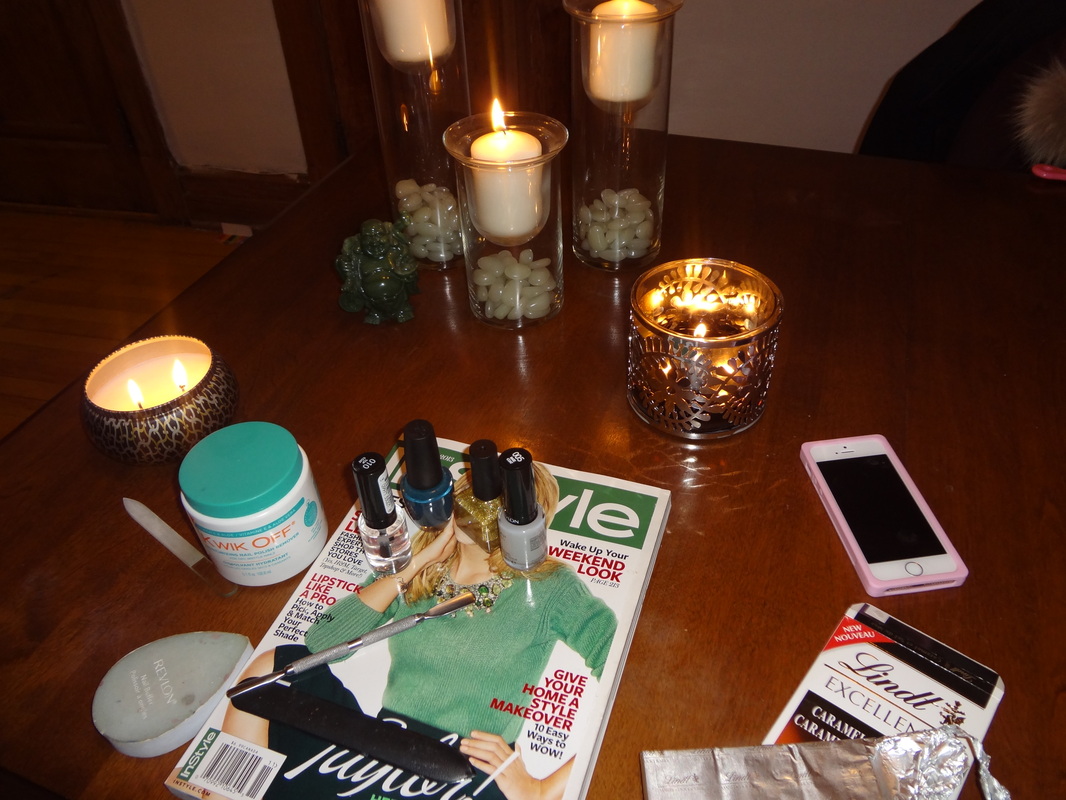
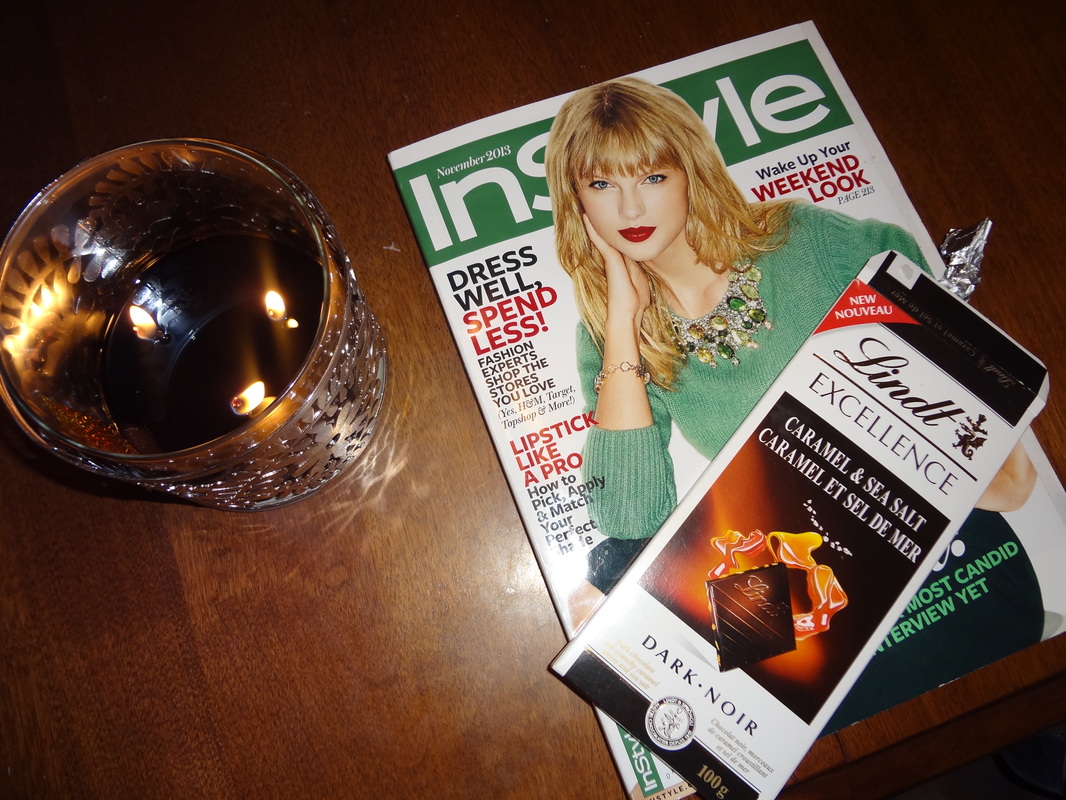
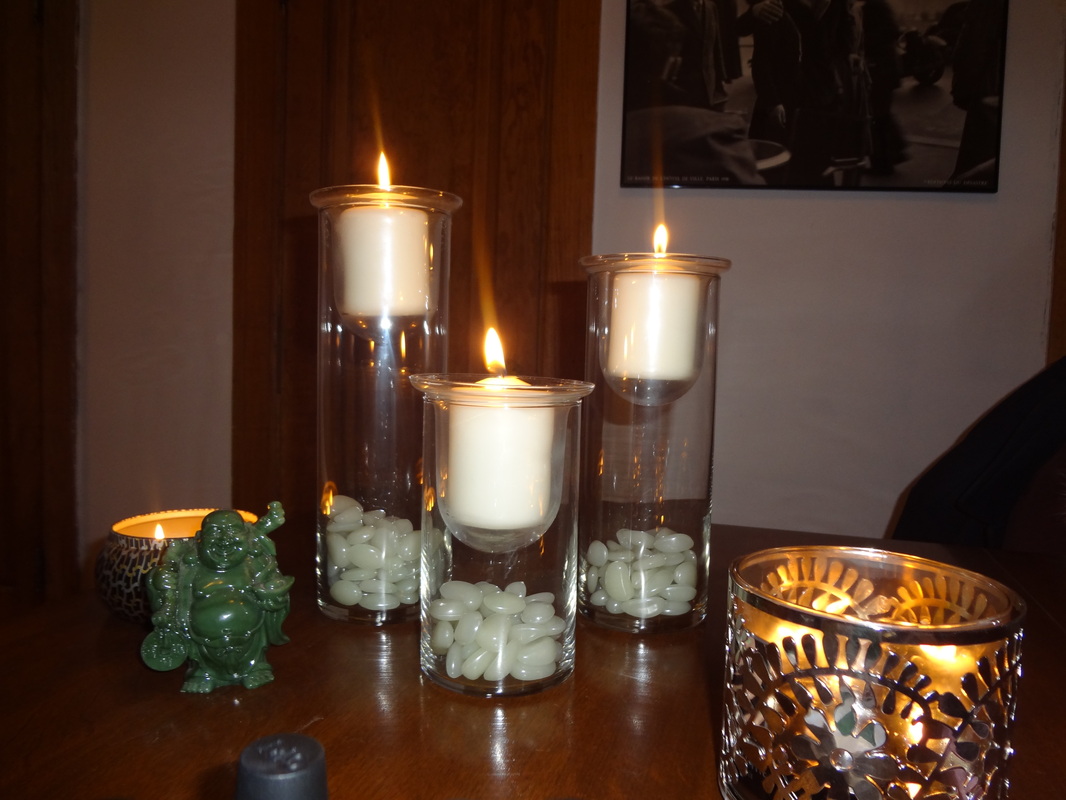
Make it an experience. Make it enjoyable. Since I try to take my time and do my nails well, I always wait until I can devote at least a full hour to the whole manicure process. I try to take advantage of nail time by making it a whole zen, girly extravaganza. I have several feminine goodies that contribute to this relaxing atmosphere, including: a girly magazine, a yummy snack (this chocolate rocked my world), my buddha friend (can you spot him?), my iPhone for music, and candles, candles, candles.
Make it an experience. Make it enjoyable. Since I try to take my time and do my nails well, I always wait until I can devote at least a full hour to the whole manicure process. I try to take advantage of nail time by making it a whole zen, girly extravaganza. I have several feminine goodies that contribute to this relaxing atmosphere, including: a girly magazine, a yummy snack (this chocolate rocked my world), my buddha friend (can you spot him?), my iPhone for music, and candles, candles, candles.
5. Enjoy the Results!
Once you've given your nail sufficient drying time (the more the merrier), then you should be good to go! As you can see, I still had quite a bit of polish left around my cuticles when I was done. Personally, I prefer getting a little colour on the surrounding cuticle than missing some of the nail. Besides, the extra colour will come off with your next shower, or you could simply soak your hands in water for a couple of minutes and delicately peel it off yourself.
Once you've given your nail sufficient drying time (the more the merrier), then you should be good to go! As you can see, I still had quite a bit of polish left around my cuticles when I was done. Personally, I prefer getting a little colour on the surrounding cuticle than missing some of the nail. Besides, the extra colour will come off with your next shower, or you could simply soak your hands in water for a couple of minutes and delicately peel it off yourself.
And there you have it! My entire nail care process, from start to finish. Now, I should confess that as much as I would like to take my time with all of these steps, desperate times do call for desperate measures. But, when I do have the opportunity to enjoy my manicure, soothing music and several candles included, I never see doing my nails as a chore. Also, the effort you put in is usually apparent, and the better quality top/base coat and filing, the longer you should go without chipping.
I wish you all a very happy Hanukkah and American Thanksgiving! May we all share in some delicious feasting and joyous company. (Amen).
I wish you all a very happy Hanukkah and American Thanksgiving! May we all share in some delicious feasting and joyous company. (Amen).
 RSS Feed